
Setting Up Your iMac
Follow these steps to set up your iMac. Wait until Step 4 to turn on your iMac.
Step 1:
Pass the power cord through the hole in the stand, plug it into the power
port on the back of your iMac, and then plug the cord into a power outlet.
11
Chapter 1
Ready, Set Up, Go
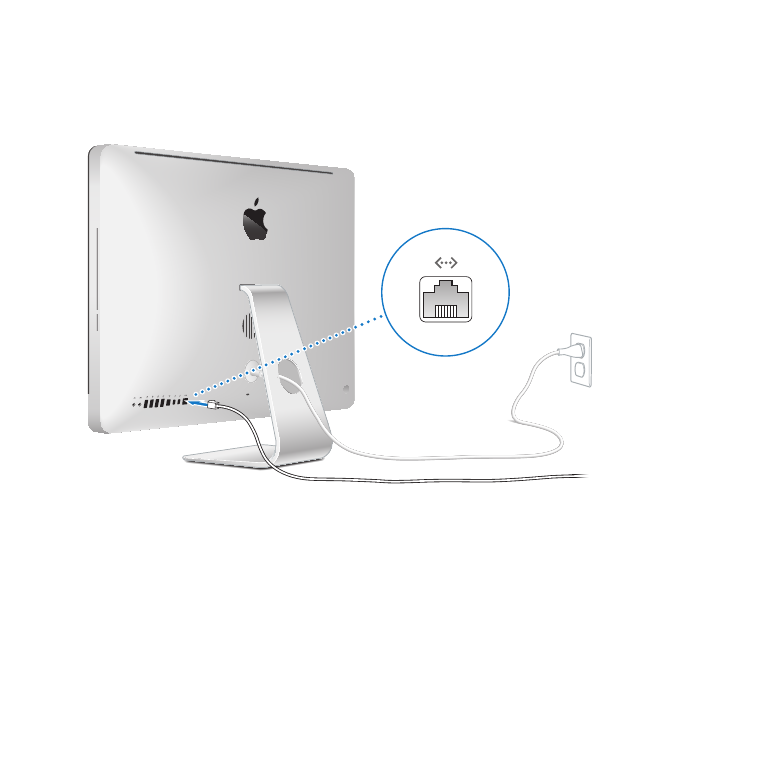
Step 2:
To access the Internet or a network, connect one end of an Ethernet cable
to the Ethernet port on your iMac. Connect the other end to a cable modem, a DSL
modem, or a network.
Your iMac comes with 802.11n Wi-Fi technology for wireless networking. For information
about setting up a wireless connection, choose Help from the menu bar and search
for “wi-fi.”
To use a dial-up connection, you need an external USB modem. Plug the modem into
a USB port on your iMac, and then use a phone cord to connect the modem to a
phone jack.
12
Chapter 1
Ready, Set Up, Go
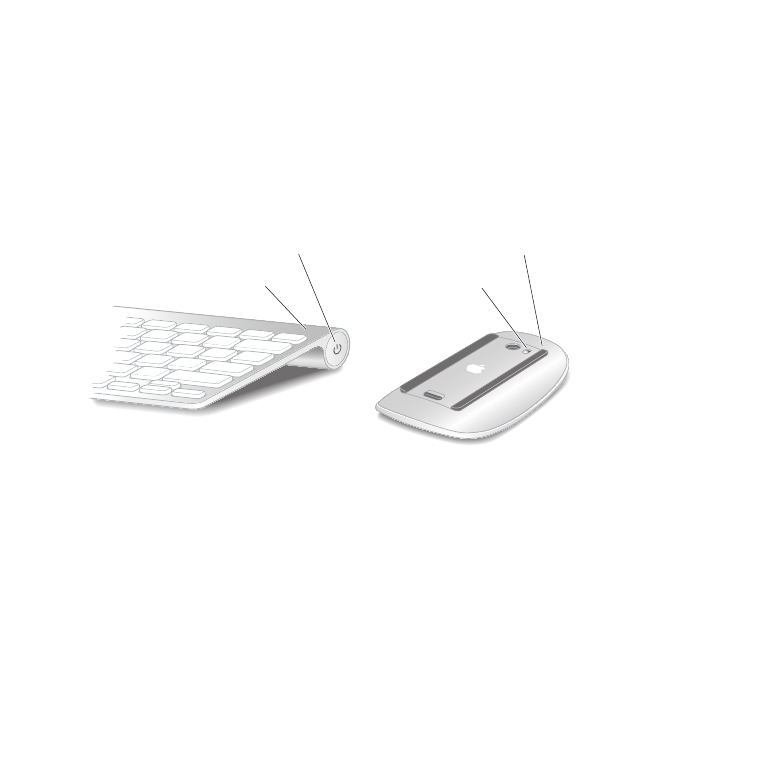
Step 3:
Turn on your wireless keyboard and mouse.
Press the power button on the right side of your Apple Wireless Keyboard and slide the
switch on the bottom of your Apple Magic Mouse to turn them on.
Your wireless keyboard and mouse come with AA batteries installed, and they’re
already paired with your iMac. Pairing allows them to communicate wirelessly with
your iMac.
Power button
Indicator light
Indicator light
On/off switch
When you first turn on your keyboard or mouse, the indicator light glows steadily for
5 seconds, indicating the batteries are good. If your keyboard or mouse doesn’t turn on,
make sure batteries are installed properly (see “Replacing the Batteries” on page 56).
The indicator light blinks until you turn on your iMac and a connection is established.
Note: If you purchased a USB keyboard or a USB mouse, connect the cable to a
USB port (d) on the back of your iMac.
13
Chapter 1
Ready, Set Up, Go
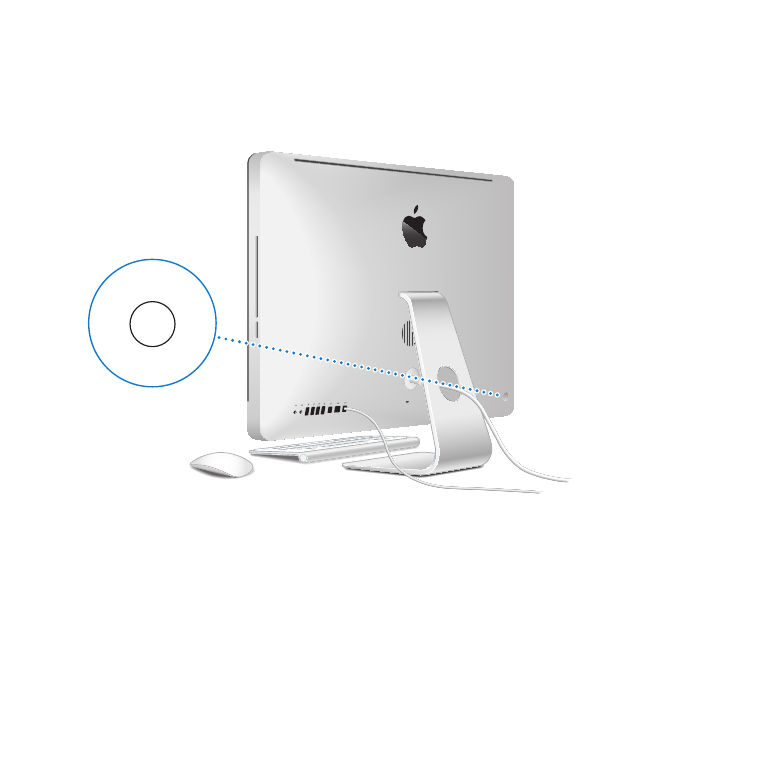
Step 4:
Press the power button (®) on the back to turn on your iMac.
You hear a tone when you turn on your iMac. Click your mouse to establish a
connection with your iMac.
®
®
®
Important:
If your keyboard and mouse aren’t paired with your iMac, follow the
onscreen instructions to pair them. You may have to click the mouse once to establish
a connection. For more information about pairing, see “Pairing Your Apple Wireless
Keyboard with Your iMac” on page 29.

14
Chapter 1
Ready, Set Up, Go
Step 5:
Configure your iMac.
The first time you turn on your iMac, Setup Assistant starts. Setup Assistant helps
you specify your Wi-Fi network, set up a user account, and transfer information from
another Mac or PC. You can also transfer information from a Time Machine backup or
other disk.
If you’re migrating from another Mac, you might have to update software if the other
Mac doesn’t have Mac OS X version 10.5.3 or later installed. To migrate from a PC,
download Migration Assistant from www.apple.com/migrate-to-mac and install it on
the PC you want to migrate from.
After you start Setup Assistant on your iMac, you can leave it midprocess without
quitting, move to the other computer if you need to update its software, and then
return to your iMac to complete the setup.
Note: If you don’t use Setup Assistant to transfer information when you first start up
your iMac, you can do it later using Migration Assistant. Open Migration Assistant in the
Utilities folder in Launchpad. For help using Migration Assistant, open Help Center and
search for “Migration Assistant.”
To set up your iMac:
1
In Setup Assistant, follow the onscreen instructions until you get to the “Transfer
Information to This Mac” screen.
2
Do a basic setup, a setup with migration, or transfer information from a Time Machine
backup or other disk:
Â
To do a basic setup, select “Don’t transfer now” and click Continue. Follow the
remaining prompts to select your wired or wireless network, set up an account, and
exit Setup Assistant.

15
Chapter 1
Ready, Set Up, Go
Â
To do a setup with migration, select “From another Mac or PC” and click Continue.
Follow the onscreen instructions to select the Mac or PC you want to migrate from.
Your Mac or PC must be on the same wired or wireless network. Follow the onscreen
instructions for migrating.
Â
To transfer information from a Time Machine backup or another disk, select “From a
Time Machine backup or other disk” and click Continue. Select the backup or the
other disk that you want to migrate from. Follow the onscreen instructions.
If you don’t intend to keep or use your other computer, it’s best to deauthorize it from
playing music, videos, or audiobooks that you’ve purchased from the iTunes Store.
Deauthorizing a computer prevents any songs, videos, or audiobooks you’ve purchased
from being played by someone else, and frees up another authorization for use. For
information about deauthorizing, choose iTunes Help from the Help menu in iTunes.
Step 6:
Customize your desktop and set your preferences.
You can quickly make the desktop look the way you want using System Preferences,
your command center for most settings on your iMac. Choose Apple () > System
Preferences from the menu bar, or click the System Preferences icon in the Dock.
Important:
You can set an option to reset your password in Users & Groups
preferences, in case you forget your login password. For help with System Preferences,
open Help Center and search for “system preferences” or for the specific preference you
want help for.

16
Chapter 1
Ready, Set Up, Go